Monday, 17 March 2014

What to do with some bits of smoked salmon 


Smoked Salmon Tortilla

  1. Gently fry half an onion in some oil
  2. Par-boil dice a couple of potatoes
  3. Put potato in with onion and fry a little
  4. Add some pepper and mixed herbs
  5. Scatter some chopped smoked salmon on
  6. Beat up four eggs and pour on top
  7. Brown a little under the grill if liked
  8. Serve with some greens
The one in this illustration seems to have been served with some sort of fruit salad - sounds an intriguing idea.

See also 10 things to do with smoked salmon from the BBC Good Food: http://www.bbcgoodfood.com/howto/guide/10-things-do-smoked-salmon and http://www.bbcgoodfood.com/recipes/collection/christmas-smoked-salmon

Wednesday, 5 March 2014

A few years ago I went to a The Ship Inn in North Berwick (https://plus.google.com/100087538062394377533/about?hl=en)  and enjoyed an excellent Cullen Skink, something which I've never been able to repeat and we haven't returned to NB, so have decided to make some myself.  But first the history of this dish.

small-beach.jpgCullen Skink is a local speciality from the town of Cullen which is in Moray, on the north east coast of Scotland (http://www.itraveluk.co.uk/content/743.html). 


The soup is often served as a starter at formal Scottish dinners.  Cullen Skink is widely served as an everyday dish across the north east of Scotland.

It has been described as 'smokier' and more assertive than chowder, heartier than classical French bisque.

The name skink is derived from Gaelic, a Scots word for a shin, knuckle or hough of beef which has developed the secondary meaning of a soup, especially one made from these.  The word ultimately comes from Middle Dutch schenke, shin, hough, similar to the English word shank.


Cullen Skink

1 tbsp butter
1 medium onion
2 medium potatoes, cut into 1cm pieces
300ml water
250g smoked haddock
250ml milk
2 tbsp finely chopped parsley or chives
s&p
  1. melt butter in saucepan, add chopped onions and cook gently for about five minutes.
  2. Add potatoes and water and bring to the boil.
  3. Simmer 10 minutes.
  4. In another pan cover haddock with milk and cook gently for about five minutes, flake gently into large pieces, removing bones.
  5. Add milk and flaked fish to saucepan and cook a further couple of minutes.
  6. Season with s&p and sprinkle with the parsley or chives.
  7. Serve with crusty bread and butter.
Cullen skink

Thursday, 27 February 2014

We're thinking of attaching something to the back of our house to extend the living area, and can't decide whether to install a conservatory or a single-storey extension.  So here are some thoughts about conservatories, seen in the Daily Telegraph this week:

1 Use 
List the ways you'd like to use your conservatory as they will all affect the final design.  Do you want to entertain, relax, garden, propagate or all these?  Is it to be an all-year-round room?  
These affect the design, construction, layout and proportions, not to mention where the conservatory would be best sited.

2 Design
You want to end up with a well-proportioned conservatory and it's important to provide an effortless link between 'inside' and 'outside'.  
This is the stage to choose what you're going to put inside the conservatory and the layout of those items.  Consider the views from the conservatory and areas best for light.  
Traditionally it was thought that the style of conservatory should echo the style of your home but now it's considered that a contemporary design  often makes minimal impact and so is preferred.

3  Aspect
A south-facing aspect may seem the obvious choice, but the sun's rays become magnified and can burn plants through glass.  Also, air becomes hot and dry, and environment that no person or plant enjoys, so blinds will be an essential addition.


4  Glazing
A conservatory relies on its glass to operate to capacity.  Solar-controlled glass can help minimise the temperature of the room and control glare.  
In a north-facing conservatory, low-emissivity (low-E) glass will reduce heat loss.  
Architecturally speaking, lanterns and coloured glass can create interest, but best to try and avoid fussy effects or, for example, replicating the details of your property's windows.  
Keep things simple as a conservatory is essentially a glasshouse in its own right, not an extension of your house.  
Aim to ensure complete transparency whilst looking out.  Neutral glass won't reflect furniture, to allow a clear view, and a wonderful link to the landscape beyond.

5  Ventilation
To ensure a comfortable atmosphere it's important to have a well-designed ventilation system, although with British weather it's unlikely that air-conditioning will be really necessary.  
Roof vents are essential in releasing a build-up of hot air.  Low-level air can be drawn in through doors or low vents, with hot air rising naturally to be released through roof venting to provide cooler atmosphere.  There are manual or automatic systems, the latter of which are very useful for busy people - or for keen gardeners.  But beware, if they malfunction and stick the rain may get in or your plants may fry!


6  Temperature
The temperature at which you heat your conservatory is perhaps the most crucial decision in terms of how you will use it.  
Your choice is not just about people - temperature dictates the plants that you grow.  Heating a conservatory year-round to the same temperature as your house (59F-70F/15C-21C), will limit your plants to the tropical spectrum.
Unheated conservatories are ideal for overwintering citrus and borderline-hardy plants, especially if you cover them with fleece.
Even if you don't heat your conservatory it should be usable for about nine months of the year, providing you dress suitably for it.  We used to have our lunch in the conservatory nearly every day of the year, donning fleeces in the winter months to enjoy our soup, bread and cheese.

7 Planning regulations
Generally, most conservatories are within permitted development rights, so long as certain size and height conditions are met.  
If you life in a conservation area, Area of Outstanding Natural Beauty, national park or a World heritage Site there are further conditions.  
Visit the planning portal (planningportal.gov.uk) for the full list of conditions or check with your local authority.
Many specialist conservatory designers and manufacturers will deal not only with design, manufacture and installation but also any planning permissions.

Some very interesting points are raised here, now I'm off to do the same investigation re having a brick extension.  I understand that even if planning permission is not needed for an extension, that building regulations are necessary. 

Something not covered here is the relative cost of a conservatory compared with a brick-built extension - and how much value, if any is added to the property.

According to the moneysavingexpert forum (http://forums.moneysavingexpert.com/showthread.php?t=317959)the cost of building a single storey extension is about £1,000 per square metre.  So for our proposed 4m x 2.5m extension that should work out at about £10,000, plus extras such as planning and building regs.

Friday, 21 February 2014

A timely explanation ...

For tired-looking borders in the garden here's an explanation of the difference between manure, fertilizer and mulch.  Do we need all three and when to apply which of these?*

Mulching is the name given to the process of adding a layer to the surface of soil over plant roots, or even over the entire surface of soil over plant roots, or even over the entire surface of beds and borders.  This does one or more of the following - conserve moisture, feed plant roots, improve soil texture or suppress weed growth


The noun 'mulch' most often refers to something organic.  Organic mulches are a mixed, potentially confusing bunch: animal manure is generally high in nitrogen, and unless completely rotted should not come into contact with plant roots or stems.  Leaf mould and composted bark have a low nutrient level and low pH.  

They are useful for mulching woodlanders and lime-haters.  Unlike mushroom compost (second-hand animal manure, thus with lower nitrogen levels and laced with variable amounts of high pH chalk), which should be kept away from them.
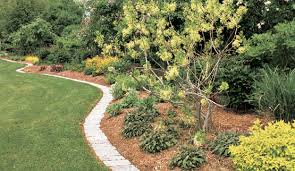
Coarse bark chippings, if applied thickly enough (at least 4"/10cm), are long-lasting, suppress weeds and retain moisture well, but can deplete the soil of nitrogen as they slowly rot down (nitrogen that can, of course, be topped up using a fertiliser - read on).  And home-made compost can be rich in nutrients but is extremely variable (depending on what goes in the bin), and is seldom perfectly seed-free.  Gravel and weed-smothering black membranes are, technically speaking, inorganic mulches.

Spring is a big feeding/mulching time in the garden, just as plant growth starts, and some diligent gardeners feed their shrubs and roses again, halfway through the summer.  Most of us, I think, tend to use a combination of mulches/soil-improvers and fertilizers (both organic and inorganic) and, increasingly, slow-release inorganic ones.

Fertilisers contain essential nutrients (and minerals), in various ratios for specific purposes in order to bolster plant growth.  Most gardeners are now familiar with the fact that nitrogen encourages leaf growth, potash boosts flower production, while phosphates encourage root development and strength.  Fertiliser packets reliable carry information about nitrogen, potassium and phosphate (NPK) content that we need to know.

So-called 'balanced' fertilisers (such as traditional organic, blood fish and bone or inorganic Growmore), are those that contain more or less equal quantities of all three nutrients.

Finally, soluble and liquid fertilisers and foliar feeds are useful, being quickly absorbed by plants under stress.


One mulch I find very useful is leaf mould


*From Helen Yemm in the Saturday Telegraph, 15 February 2014, Helen's always a valuable source of information.


Tuesday, 24 December 2013

Free food
The first in an occasional series on ideas for eating ‘for free’, as they now say:

Just Wild About Woodlice
From a 1885 book Why not eat insects? By Vincent M Holt

‘Woodlice sauce is equal, if not distinctly superior to shrimp’ wrote the Victorian Naturalist Vincent M Holt. ‘Put into a saucepan a quarter of a pound of fresh butter, a teaspoonful of flour, a small glass of water, a little milk, some pepper and salt.  Place it on the stove, heat and stir.  As soon as the sauce is thick, take it off and put in the (boiled) wood-lice. This is an excellent sauce for fish.’


Tuesday, 12 November 2013

A young friend came to stay for the weekend and made us some soda bread one morning! yum yum!  So will find a recipe on here to try one day when we run out of bread - and actually have an oven, which we don't at present.
Soda bread
Here's one recipe from the ever helpful BBC (http://www.bbc.co.uk/food/recipes/irishsodabread_67445):

Ingredients

Preparation method

  1. Preheat the oven to 400F/200C/Gas 6.
  2. Tip the flours, salt and bicarbonate of soda into a large mixing bowl and stir.
  3. Make a well in the centre and pour in the buttermilk, mixing quickly with a large fork to form a soft dough. (Depending upon the absorbency of the flour, you may need to add a little milk if the dough seems too stiff but it should not be too wet or sticky.)
  4. Turn onto a lightly floured surface and knead briefly.
  5. Form into a round and flatten the dough slightly before placing on a lightly floured baking sheet.
  6. Cut a cross on the top and bake for about 30 minutes or until the loaf sounds hollow when tapped. Cool on a wire rack.


...and while I'm at it, here's a good recipe for scones, for those days when there's no bread in the house:

Ingredients

  • 225g/8oz self raising flour
  • pinch of salt
  • 55g/2oz butter
  • 25g/1oz caster sugar
  • 150ml/5fl oz milk
  • 1 free-range egg, beaten, to glaze (alternatively use a little milk)

Preparation method

  1. Heat the oven to 220C/425F/Gas 7. Lightly grease a baking sheet.
  2. Mix together the flour and salt and rub in the butter.
  3. Stir in the sugar and then the milk to get a soft dough.
  4. Turn on to a floured work surface and knead very lightly. Pat out to a round 2cm/¾in thick. Use a 5cm/2in cutter to stamp out rounds and place on a baking sheet. Lightly knead together the rest of the dough and stamp out more scones to use it all up.
  5. Brush the tops of the scones with the beaten egg. Bake for 12-15 minutes until well risen and golden.
  6. Cool on a wire rack and serve with butter and good jam and maybe some clotted cream

Thursday, 7 November 2013

Tea Bread

ha ha!
Now that we're definitely moving I'm sorting out cupboards, especially in the kitchen.  I've come across the bottom of lots of packets of shreddies, shredded wheat and all bran, the bits which no-one wants to eat. 

No-one seems to like to eat the bits at the bottom of the packets, probably because, although they're perfectly alright, they tend to go soggy when the milk's added.  So am going make a fruit loaf with them.


Here's my take on the classic All-Bran tea bread recipe:

5oz cereal (mine was mixture of shredded wheat, shreddies and all bran)
5oz raisins or sultanans
10 fl oz tea, milk or orange juice
2 oz sugar
6 oz SR flour
2 eggs
  1. Soak cereal in tea/milk/juice for a couple of hours.  
  2. Add dried fruit, sugar and eggs.  Stir in flour.
  3. Cook about an hour at about 190C.
  4. Eat: sliced, and spread with lots of butter.