Saturday 31 March 2012

Stuffed Peppers


Two recipes and I can't decide which one to try:
Vegetarian Stuffed Peppers
Serves 4

  • 4 large green peppers
  • 1 medium onion, chopped
  • 2 cloves of garlic, crushed
  • 4 ozs (112g) long-grain rice, cooked
  • 8 ozs (225g) tomatoes, chopped
  • 2 sprigs of parsley, chopped finely
  • 4 ozs cheddar cheese, grated
  • 2 ozs (56g) butter
  • 1 tablespoon olive oil
  • Salt and pepper
Method
  • Cut a slice off the top of each pepper, remove centre core and seeds.
  • Brush each pepper on the outside with the olive oil and then stand the peppers upright in an ovenproof dish.
  • Melt the butter in a saucepan and fry the chopped onion gently. Add the tomatoes, rice, parsley, crushed garlic, salt and pepper and combine.
  • Pile the mixture into the pepper shells.
  • Top each pepper with grated cheese.
  • Bake for 30-40 minutes in a pre-heated oven at Gas Mark 4 (350°F/180°C) until the peppers are tender. Serve hot.
Note: Chopped mushrooms can replace some of the tomatoes in the mixture 

Bacon Stuffed Peppers
Serves 6
6 small-medium red peppers
  • 200g (7oz) streaky bacon, chopped
  • 1 onion, peeled and chopped
  • Knob of butter
  • 30g (1oz) breadcrumbs
  • 2 hard-boiled eggs, shelled and chopped
  • 45g (1½oz) finely grated Cheddar cheese
  • Salt and freshly ground black pepper
  1. To make the filling: Put the bacon, onion and butter in a frying pan and cook gently for about 10 mins, until onion is tender. Take off heat and stir in breadcrumbs, chopped egg, half the cheese and some seasoning.
  2. Set the oven to 180°C/Gas Mark 4. 
  3. Cut tops off peppers and pull out the cores and seeds. Rinse them well. Slice a little off bottom of peppers, if necessary, so that they stand up straight.
  4. Spoon the filling into the peppers and sprinkle with the rest of the cheese. Stand them in a roasting tin, cover loosely with foil and bake for 45 mins. Remove the foil and cook for another 10 mins, to brown the tops. Serve hot with peas, or cold with salad.


Tuesday 20 March 2012

Famly Favourite

Vegetable Pie with a Herby Crust
2 leeks, 2 courgettes or similar, sliced
2 tbsp olive oil
2 cloves garlic
grated zest of a lemon
4 ripe tomatoes, sliced
1/4 pt vegetable stock
2 tbsp sundried tomato paste
1/4 pt double cream
3 tbsp ch mixed parsley and oregano

Topping
8 oz SR
3 oz butter
1 tbsp chopped basil
2 oz red Leicester or Cheddar cheese, grated
3 - 4 tbsp milk 
  • Heat oil in pan, add leeks, garlic, lemon zest, fry gently 5 mins. 
  • Add courgettes and cook 5 mins, until softened.
  • Add tomatoes to pan with stock, tomato paste and cream.
  • Cover, simmer gently 20 mins. 
  • Add herbs, season.
  • Topping: sift flour and rub in butter. 
  • Add basil and half cheese and enough milk to form dough.
  • Roll out dough to 1 cm thick. Using 5cm pastry cutter, stamp out round, making 12.
  • Put vegetable stew in dish, arrange scones around the edge of dish, overlapping slightly. 
  • Brush scones with milk, sprinkle with cheese.
  • Bake at 220 C (No 7) for 20 - 25 mins.
  • 4 January 2014: I made this dish today.  However, we don't have a proper kitchen at the moment so had to make some 'adjustments':
  • No scales so when it came to making the scones, guessed the ingredients. 
  • Then realised I had no baking powder. Looked up on the internet and found that for 8 oz plain flour use 1 tsp bicarb and 1 tsp vinegar.  So added these but then worried that it wouldn't rise properly, so added an egg.  And it was fabulous!  Certainly worth making again.
  • I had no marjoram so used some fresh basil which I'd bought and didn't know what to do with.
  • The other 'adjustment' was using low-fat creme fraiche instead of cream and it was just as good.

Monday 12 March 2012

8 Cracking Ideas for EGGS


1  Shine your shoes: the thick, sticky properties of beaten egg white make it a brilliant leather cleaner.  Use a dry cloth and sparingly apply to leather in a circular motion, then watch the dirt lift off.  The proteins in egg white also protect and moisturise leather, giving it great shine.


2  Gourmet gardening: don't bother shelling out on plant food - simply mix crushed eggshells into your compost, or straight into the soil.  As the shells break down they release calcium, a mineral plants use to build the new cells and membranes required for growth.  Beaten egg can also be wiped or paint onto the leaves of indoor plants to make them strong and shiny.


3  Haircare for eggheads: an egg yolk is all you need to achieve lustrous looks.  Yolk is very conditions because of its high protein content.  If you have dry hair, mix one egg yolk with about 1/4 pt of warm green tea. Massage the hair, leave for five minutes and rinse in lukewarm water.  For oil hair, follow the instructions above, substituting egg white.


4  Goodbye gum: if you find yourself in a sticky situation with chewing gum on your clothing, apply egg white to the gum with a toothbrush.  Leave for 15 minutes then rinse off with cool water.    The egg white breaks down the proteins in gum, making it softer and less sticky.


5  Egg on your face: for an instant face life, whisk the white of one egg and apply a thin coating to a clean, damp face.  Leave on for 15 minutes then rinse off with cool water.  You'll experience a tightening effect, due to the albumin found in egg whites which causes the skin to contract when it dries.  This helps smooth the area and temporarily diminishes fine lines.


6  Revamp your paint:  Mixing your own egg tempera paint is an easy way to achieve intense colours that are fast-drying and long-lasting.  Simply mix a small amount of egg yolk with an equal volume of paint pigment (from art shop in powder form), then dilute with water to achieve the desired consistency.  Egg tempera works best on boards and wooden surfaces.


7  Bye-bye slugs: Placing broken eggshells around plants will deter slugs and snails because these garden pests hate sharp objects.  Rinse the shells thoroughly before crushing gently.


8  Get gluing: if you've run out of glue, grab an egg and use the white as a natural adhesive for paper and cardboard.  The glue is waterproof once dry - ancient Native American tribes used it as an adhesive to build canoes!

Saturday 3 March 2012

March 'on the plot'


Now March is here we're starting to do more on the allotment.


We've been busy preparing the ground, clearing 'stroil' and unearthing buried corrugated iron sheets, bits of carpet, old plastic sacks and other rubbish.  The corrugated iron sheets will be useful on the allotment, probably for containing the car load of horse manure which we collected yesterday (that was fun!).


The potatoes have arrived and are chitting, ready to be planted very soon.  This year we're sowing some on the allotment and also three varieties in bags on the patio - to compare yield and amount of work involved.  


The seeds we ordered are here.  As we're going away for a week or so at the end of the month, it's not worth sowing many as we won't be around to water them if there's a drought like there was last year.  In 2011 it hardly rained here from March right through until July, although it did elsewhere in England, in fact they were complaining about too much rain!  I've catalogued the seeds and now we have a shopping list for the remainder.  


12 March: 
We've now planted shallots, red onions, some lettuces and potatoes.  
There's talk on the news of a hosepipe ban, so everyone's saving as much water as they can.

Rules used to be that it was OK to have a bonfire after 4pm in winter and 7pm in summer.  Now the rules have changed.  It's perfectly all right to have at bonfire at any time so long as it doesn't annoy those around you.


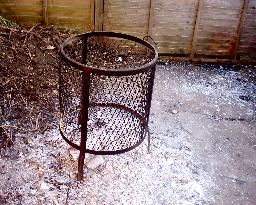
It's not really the act of burning rubbish that creates trouble but the volume of smoke that bonfires generate, which is usually the result of attempting to burn damp vegetation and grass.  Firing up has often led to confrontation between neighbouring gardeners.  So it's important to ensure that what is burnt is as dry as possible and to preferably contain the confirm in a basket or dustbin brazier, or similar.


The brazier can be stocked up with all manner of unwanted rubbish, such as diseased material, perennials weeds and their rootstock and spent garden twine. If lit when tinder dry, the result is a fire with very little smoke.  Another great advantage of the brazier is space is kept to a minimum and the ashes to not blow about in windy weather.  


Bonfire ash has long been highly valued as a source of potash. Woody vegetation is considered to be particularly good for producing ash residue with probably the Moors of the eastern Mediterranean being first gardeners to recognise the value of plant ashes as a fertiliser.


What's more, bonfires are considered to be one of the few activities which men can do without being invaded by women, so I say let's leave them to it! - and get on with the weeding ... which unfortunately still seems to be a mainly female activity.


Friday 2 March 2012

manure - compost - dung

Busy day today: we collected a car-load of horse manure from near by.  I know it's good stuff - but now what to do with it?


Apparently the best poo to use is from chickens (or other birds) as their poo contains both solid and liquid parts.  The liquid part is high in nitrogen, potassium and sulphur, so as horses' poo is only the solid bit it's likely to be deficient, unless the manure's from a stable, when it's likely to have both.


Horse dung has also received a bad press as it often contains weed seeds.  One way to avoid this problem is to leave it in a big pile until it 'cooks', thus destroying the weed seeds, and by big, the optimum size is about a metre cube.


To make a horse manure heap: layer of dung 6" deep, water it, then add a layer or general purpose fertiliser, followed by a green layer (leaves, food scraps, hay etc). Repeat until about a metre high.  Create ventilation holes, using crowbar or similar. Turn the heap about every three weeks and this should be ready in a couple of months.
If you don't want to use it yet, keep it slightly damp and covered.


See: http://www.horsetalk.co.nz/features/horsedung.shtml